Lidast
You can download the Latest Version here. If this is your first time installing Lidast, you might also check Hardware Requirements and our Installation Guide. Principles on how Lidast works are described in the Software Manual. Documentation of the Development can be found at Previous Versions
For developers: You might get access to the Source Code on request by contacting Science Data Services
Download
Latest Version
| Version | File | ReleaseNotes |
|---|---|---|
| 1.0.13 | Download Lidast 1.0.13 | abcdef.txt |
Previous Versions
| Version | File | ReleaseNotes |
|---|---|---|
| 1.0.10 | on request | abcdef.txt |
Changelog'
| Date | Version | Changes applied |
|---|---|---|
| 2015-12-06 | Version 1.0.12 | Help Texts added, Sub-Herd Selection |
| 2015-10-08 | Version 0.9.13 Build 3 | Create APE Models |
Requirements
This Software is designed to work on very basic Hardware. As long as you have a relatively new and regularly updated Windows, the Lidast Client will most probably work on your computer. Most important is a working internet connection since all access to data works via Internet.
If you enocunter any problems, you might contact us for assistance.
| System Architecture | This system runs on 32 and 64bit Systems |
| Operation System | Microsoft Windows |
| Win Version | Win 7, Win 8, Win 10 |
| HDD Space required | 150MB |
| RAM | 2 GB |
| Misc | Requires active Internet Connection |
Installation Guide
content will follow. Basically its straight forward, download the file, extract (unzip) and click on "setup.exe"
Manual
General Structure of Lidast
General Structure of Lidast
//Note: Lidast is in Development, many functions are not yet implemented.
File
User can log in and out from the Lidast Server. That is of relevance if you are working with different installations of Lidast eg. connecting to Servers from different Universities. Most probably you will not use this function.
Import
Section to manage data transfer from local sources into Lidast:
Import data which were collected using the Progeny History Survey (PHS) Method
Import Data from a local CowSense installation
Importing PRY Models is not yet supportet, you can create Models in PRY and transfer them via the Data-Transfer Section in PRY
Migrate
Generate PRY and/or APE Models from Raw-Data Sets:
Build PRY Models from a PHS Data Source Build PRY Models from a CowSense Data Source
Build an APE Model from a PHS Data Source
About
Meta-Data, Links, Licenses ...
Login
Import Data
PHS Format
PHS - Progeny History Survey
//Description of Method
PHS data can be transferred into Lidast by using the PHS import template files:
Upload Template Files
Media:PHS-BreedingFemales.xlsx
Meta-Data and Explanations:
Media:OBD-PHS_BreedingFemales.xlsx
Media:PHS-Disposal-code-definitions.xlsx
Things to consider when filling the Files:
Variables with an "_ID" - suffix require special attention:
ID-Vars Every uploaded herd (resp. a number of animals which are analyzed together) must have a unique Herd_ID. Within this herd, each animal requires an unique Animal_ID. Animals from differend herds can share the same Animal_ID. dam_ID creates the reference of an offspring to its mother-animal. (Therefore should be filled with the Animal_ID its dam.
Char-Vars: These are only for human readability,
CS Format
Utilize Data
When creating a model dataset, you have to choose the animals from which the model dataset will be calculated from. The general unit for processing data in Lidast is a herd. You can not group more than one herd to create a dataset, based on animals across different herds. However, if you wish to analyze different sub-sets of animals from a herd, you can choose individual animals from a herd. For example one may compare the productivity of the top performers against the low performers. The next paragraph describes how the selection of sub-herds for model-creation is working. If you wish to work on complete herds, you may skip the next part.
Choose a sub-Herd
When creating a model file for PRY or APE (others may follow), you now can select individual animals from your herd in order to make a comparison of animal-groups from within your herd.
How to use:
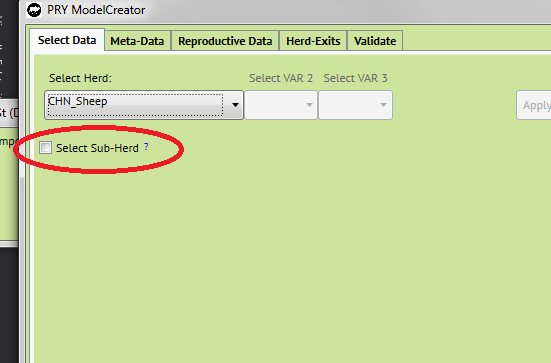
Click on "Select Sub-Herd" to display a table with all your female breeding animals.
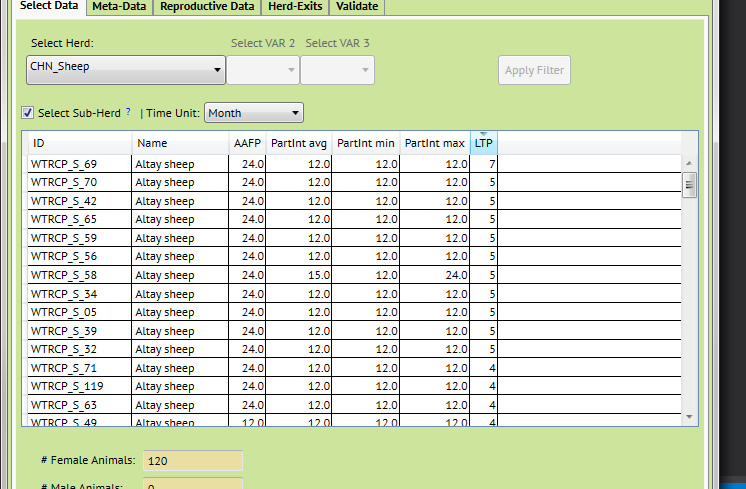
The now appearing table shows all female breeding animals in your herd with some reproductive performance data.
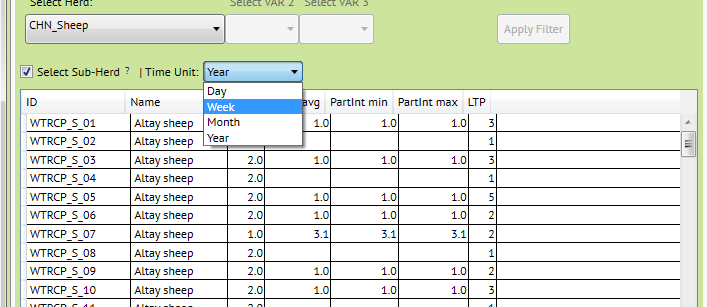
On top you have the "Time Unit Selector". This is a temporary selection for an appropriate display of your date in this window. It has no effect on the PRY Model creator, where you might select another unit in a later dialogue. So you might change this time unit, also on-the-fly when working with this table, according to your needs.
| Column" | Content |
| ID | The female breeding Animals unique ID |
| Name | The female breeding Animals Name as defined by you |
| AAFP | The age at first parturition - encoded in the time-unit that you have selected above |
| PartInt avg | The average parturition interval, taking into consideration all parturitions of this animal |
| PartInt min/max | The lowest and highest parturition interval of this female breeding animal |
| LTP | Life Time Production - The animals total number of live-born offspring in the table |
You might sort your data by column
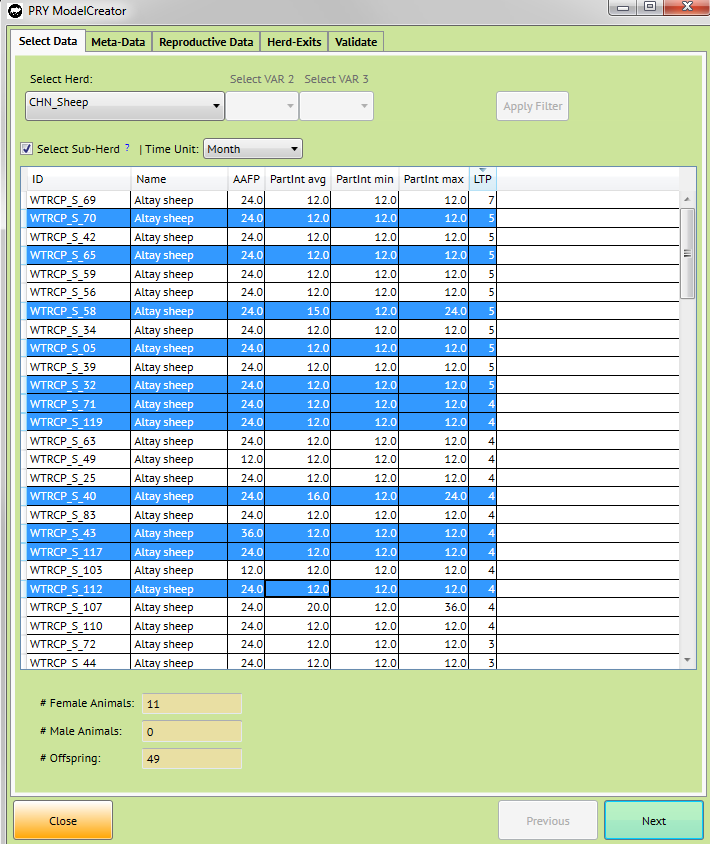
And select individual animals from the list for the creation of a PRY or APE model dataset
Rules of this table
- There is no PartInt for animals which only had one parturition
- When choosing animals from "Sub-Herd" only those offspring will be used in the model which have a mother defined in the table (see DataQuality Issues)
Note how the number of female/male animals is changing when selecting/deselecting animals from the list
When finished, you may proceed with your individually selected herd by clicking ->next
Create a PRY Model
Age at first Parturition
Mortality Rates of Male Animal
Mortality Rates of Female Animals
Create an APE Seed Herd
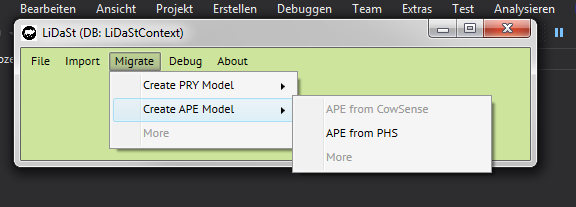
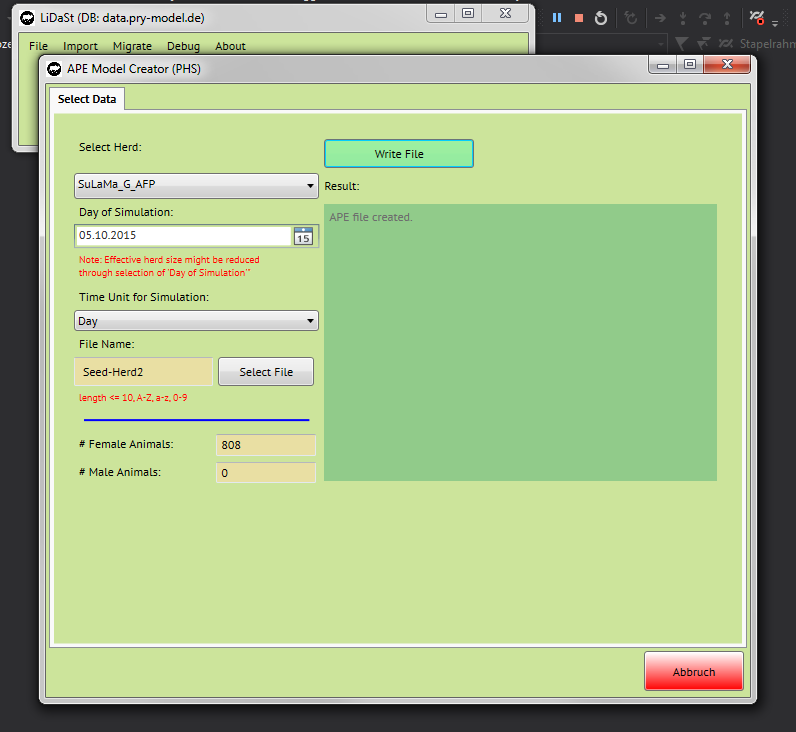
1.) You find the APE File Creator in the Menu at Migrate -> Create APE Model (See picture below).
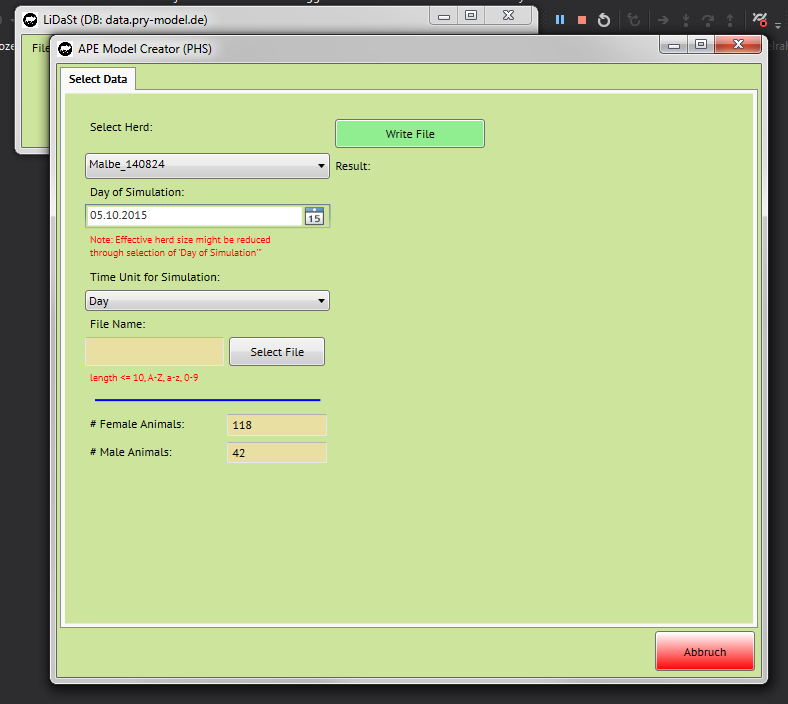
2. Clicking on that menu point, the dialogue of the APE File Creator is opening
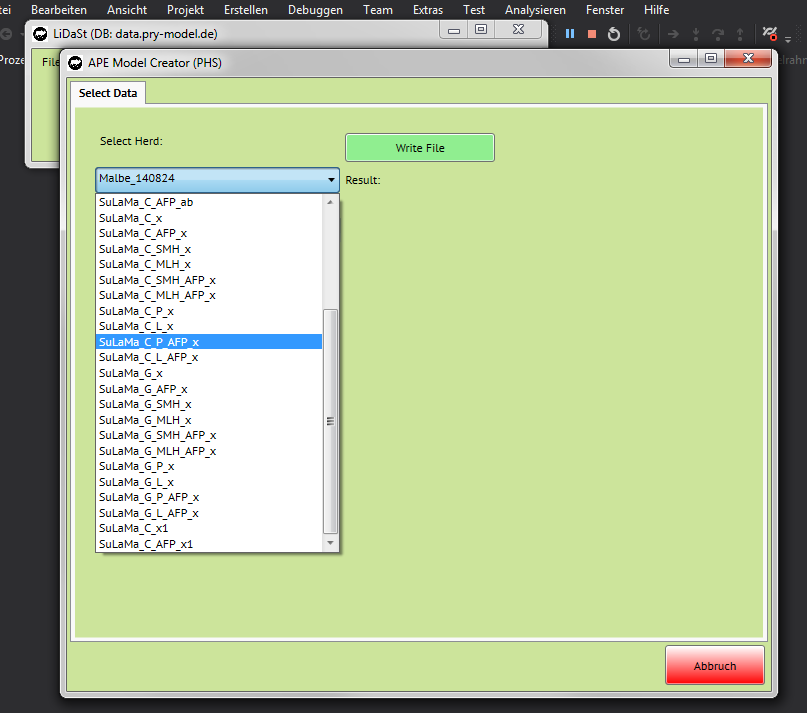
3. You might select the herd which should serve as the base population for the APE Model Simulation
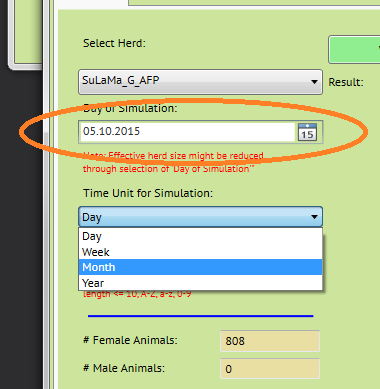
Day of Simulation
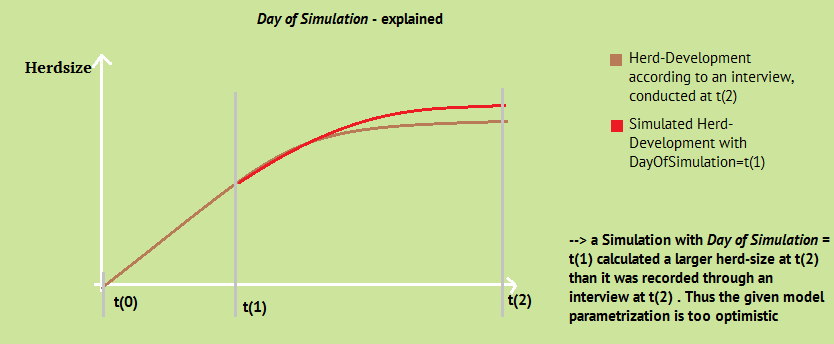
You can select the Date of Simulation. In the case that you want to see how your herd will develop in future, you might just leave the Day Of Simulation at its default value, which is just today. Every value you put here which is after the day of interview will consider all animals and all births that are recorded in your dataset. But if you want to simulate a herd based on the actual-state from a previous date, you might select any date in the past here.
The impact of selecting a past date is:
- Only animals alive at the given date will be considered
- Offspring will only considered if born before the selected date
- your herd-size might be decreased significantly by choosing a date far away from the date of interview
By changing Day of Simulation to the past you are able to compare simulation vs. reality. One of the possible options is to validate and adjust your parameterization and/or check interviews with farmers on consistency. Below (and on the graphic left) there is an explanation on how you are able to validate your parameterization by comparing the final herd-characteristics (size,composition and so on) between a simulated and an interviewed or observed herd.
How to Validate the Parametrisation of your Model
When creating a model you might choose a Date of Simulation in the Past. Note that the number of animals most proably will be lower than the actual herd ( and the herd-composition will differ). This effect will be stronger in growing herds and under a less controlled management compared to static herds with no growth and a strongly controlled herd composition as they might be found in stronger managed systems such as an intensive dairy production farm or so. Considerations on what DayOfSimulation should be used are:
- t(0) : Birth of first animal in your recordings
- t(1) : DayOfSimulation
- t(2) : Day of Interview
- t(3) : Today
- What is the generation interval of your species in the given productive system?
- t(2) - t(1) should at least be 1-2 generation intervals to give the herd enough time to develop. An increase in delta(t) will make your simulation more significant
- What is the difference in Herd Size between t(2) and t(1)?
- There should be a clear difference in herd size, so that there is a chance for the simulation to develop a herd.
Time Unit of Simulation
This selection does not affect the calculation itself. It just defines in what unit the results will be displayed. To choose an appropriate Time Unit you may consider the following things:
- The Generation Interval of the Species you are going to analyze
- If you work with Species which are reproducing within hours or days (eg. bacteria), it makes sense to work in those time units, similarly you might consider years or months when dealing with cattle/buffalo or other annualy reproducing species
- The precision of your interview (or otherwise collected) data
- If you were only able to get answers in the range of seasons (eg. offspring born in spring) then you should either work with months or years
What not to do: An example would be goats, which are only born once a year in spring. There is no meaning to calculate such species at a "day" precision, since the statement "herd 1 has an inter-litter interval of 290 days, while herd 2 has an inter-litter interval of 380 days" is meaningless in an environment where there is only one offspring born in spring.
Choose File Name
5. You need to choose a File-Name to save the created Data. You might use the "Select" Button to choose a Path to easily find the created File. Since PRY-APE in its current Version is a DOS Program, you might only use basic-Characters and a limited length on your File-Name. File-Names which do not meet the given restrictions will be corrected automatically, in this case you will receive a Warning.
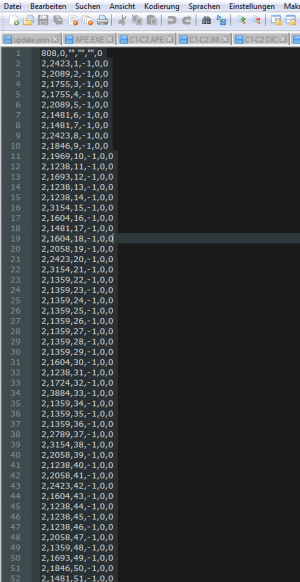
6. After everything is setup, you might be ready to create the Initial Seed Herd File. When clicking on write File, the Source-Database will be taken to write an APE Initial Seed Herd Data File which is compatible with the PRY-APE Dos Module. You will find your file at the stated directory on your hard disc.
- Things to Consider
- There is no quality Control - If you have Error in your Data (Date of Offspring born is before BirthDate of Mother etc.), this data will corruptyl be transferred to the APE-File, you might encounter Errors in simulating
- Since there is no need of considering male animals in the regular PRY (Version 3.x), you might only have female Livestock imported. Ths will lead to a strong bias when Simulating your herd wit APE. It is importand to have saved an actual image of your herd, including all livestock, whether male or female
